
Sous Vide Pork Carnitas
There’s something unforgettable about a perfectly cooked batch of pork carnitas. Tender, juicy, flavorful, and lightly crisped before serving, carnitas are one of those comfort foods that feel equally at home at a backyard gathering, game day party, camping trip, or cozy weekend dinner at home.
Disclosure: Some links in this post may be affiliate links, which means we may earn a small commission if you make a purchase through them, at no additional cost to you. As an Amazon Associate, we earn from qualifying purchases. We only recommend products we use, love, or believe may be helpful to our readers. Thank you for supporting Low Carb Adventure!
Traditionally originating from the Mexican state of Michoacán, carnitas were often prepared slowly over low heat until the pork became incredibly tender and rich with flavor. Sous vide cooking takes that same concept and elevates it even further by maintaining precise temperature control for hours, resulting in exceptionally juicy pork that practically falls apart with a fork.
One of the best things about sous vide pork carnitas is their versatility. They can be served traditionally with onions and cilantro, piled into carb-alternative taco shells, spooned over salad bowls, tucked into lettuce wraps, or enjoyed alongside fresh Salsa Verde, avocado, crema, or pickled onions.
Even better, this recipe is ideal for meal prep, RV adventures, camping trips, or feeding a hungry crowd.
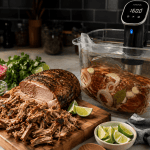
Sous Vide Pork Carnitas
Equipment
- 1 Sous Vide Machine Either a circulator with a stock pot or dutch oven or a all-inclusive machine.
- 1 Vacuum Sealer Unless a BPA-free freezer bag is used.
Ingredients
- 3 pounds pork shoulder roast
- 1/4 cup olive oil
- 1 tsp chili powder
- 1 tsp oregano
- 2 tsp cumin (to taste)
- 1 tsp salt
- 1/2 tsp freshly ground black pepper
- Juice of 2 limes
- Juice of 1 lemon
- Juice of 1 orange
- 1 cup organic chicken stock (homemade is best)
- 1 medium onion
- 1 tbsp sugar-free maple syrup (with monk fruit or erythritol)
- 2 garlic cloves, thinly sliced
- 2 bay leaves
Instructions
- Pat the pork roast dry to ensure the dry rub adheres.
- Rub the olive oil evenly over the entire roast.
- In a small bowl, combine the chili powder, oregano, cumin, salt, and pepper. Sprinkle generously over the roast and massage it into the meat.
- Place the seasoned pork into a BPA-free 1-gallon freezer bag or vacuum-sealed bag. Freezer bags are recommended because they are thicker and more durable for long sous vide cooking times.
- Allow the seasoned pork to marinate for 1 to 2 hours before adding the remaining ingredients. This extra time helps the spices penetrate the meat and deepen the flavor.
- Once the dry rub has had time to work its magic, add the lime juice, lemon juice, orange juice, chicken stock, sliced onion, garlic, honey or agave, and bay leaves to the bag.
- Seal the bag carefully, removing as much air as possible. If using the water displacement method with a freezer bag, slowly lower the bag into water while leaving one corner open to push the air out before sealing completely.
- Attach your sous vide circulator to a large stock pot, Dutch oven, or dedicated sous vide container. Fill with enough water so that the level falls between the minimum and maximum fill lines on your machine after the pork is submerged.
- Preheat the water bath to 160 degrees Fahrenheit. Because this recipe cooks for an extended period of time, choose a safe location away from high traffic areas where heat and moisture will not damage nearby surfaces.
- Once the water reaches temperature, carefully lower the sealed pork bag into the water bath. Secure the bag to the side of the container using a clip if needed to keep it away from thecirculator.Cook for: Minimum: 8 to 10 hours Ideal texture: 12 hours Maximum: 16 hours
- After cooking, carefully remove the bag from the water bath and place it into a large bowl. Allow it to cool for about 15 to 20 minutes before opening, as the contents will be extremely hot.
- Transfer the pork to a cutting board or large pan and reserve some of the flavorful cooking liquid and onions. Using two forks, shred the pork into bite-sized pieces.
- Optional Crispy Finish – For authentic carnitas texture, spread the shredded pork onto a baking sheet and broil for 3 to 5 minutes until the edges become lightly crisp and caramelized. Spoon a little reserved cooking liquid over the meat before serving to keep it juicy.
- Serve with warm carb alternative tortillas or lettuce for wrapping. These carnitas go great with our Salsa Verde and Pickled Onions, plus avocado slices, sour cream, shredded cheese, cilantro, and lime wedges. Enjoy!
Why Pork Shoulder Works Best
Pork shoulder is the ideal cut for preparing carnitas using the sous vide method because it contains enough fat and connective tissue to become incredibly tender during the long cooking process. As the meat slowly cooks in the sous vide bath, the collagen breaks down gently, creating rich, succulent pork without drying it out.
Unlike traditional cooking methods where timing can be inconsistent, sous vide cooking allows the pork to remain juicy and tender even after many hours.

Preparing the Pork
Start by placing the pork shoulder on a large cutting board or baking sheet. Pat the roast dry with paper towels to help the seasoning adhere more effectively.
Rub the olive oil evenly over the entire surface of the pork. In a small bowl, combine the chili powder, oregano, cumin, salt, and pepper. Sprinkle the seasoning mixture generously over the roast and massage it into the meat.
Place the seasoned pork into a BPA-free 1-gallon freezer bag or vacuum-seal bag. Freezer bags are recommended because they are thicker and more durable for long sous vide cooking times.
Allow the seasoned pork to marinate for 1 to 2 hours before adding the remaining ingredients. This extra time helps the spices penetrate the meat and deepen the flavor.
Building Flavor with Citrus and Aromatics
Once the dry rub has had time to work its magic, add the lime juice, lemon juice, orange juice, chicken stock, sliced onion, garlic, honey or agave, and bay leaves to the bag.
The citrus juices are one of the keys to great carnitas. The acidity helps tenderize the pork while adding brightness that balances the richness of the meat.
Seal the bag carefully, removing as much air as possible. If using the water displacement method with a freezer bag, slowly lower the bag into water while leaving one corner open to push the air out before sealing completely.
At this stage, the pork can either be cooked immediately or refrigerated overnight for even more flavor development.
Setting Up Your Sous Vide Water Bath
Attach your sous vide circulator to a large stock pot, Dutch oven, or dedicated sous vide container. Fill with enough water so that the level falls between the minimum and maximum fill lines on your machine after the pork is submerged.
Preheat the water bath to 160 degrees Fahrenheit.
Because this recipe cooks for an extended period of time, choose a safe location away from high traffic areas where heat and moisture will not damage nearby surfaces.
Cooking the Carnitas
Once the water reaches temperature, carefully lower the sealed pork bag into the water bath. Secure the bag to the side of the container using a clip if needed to keep it away from the circulator.
Cook for:
- Minimum: 8 to 10 hours
- Ideal texture: 12 hours
- Maximum: 16 hours
The longer cooking time creates even more tender, shreddable meat while preserving moisture.
Shredding and Finishing the Pork
After cooking, carefully remove the bag from the water bath and place it into a large bowl. Allow it to cool for about 15 to 20 minutes before opening, as the contents will be extremely hot.
Transfer the pork to a cutting board or large pan and reserve some of the flavorful cooking liquid and onions.
Using two forks, shred the pork into bite-sized pieces.
Optional Crispy Finish
For authentic carnitas texture, spread the shredded pork onto a baking sheet and broil for 3 to 5 minutes until the edges become lightly crisp and caramelized. Spoon a little reserved cooking liquid over the meat before serving to keep it juicy.
This extra step adds incredible texture and flavor.
Serving Suggestions

Serve your carnitas with:
- Warm carb alternative tortillas
- Lettuce for wraps
- Fresh Salsa Verde
- Pickled onions
- Diced avocado
- Cotija cheese or Monterey Jack
- Sour cream or crema fresca
- Fresh cilantro
- Lime wedges
These carnitas are also incredible in burrito bowls, salads, stuffed peppers, carb-alternative nachos, or scrambled eggs the next morning.
Meal Prep and Freezer Tips
One of the biggest advantages of sous vide carnitas is how well they freeze and reheat.
Before Cooking
You can assemble the entire recipe in freezer bags ahead of time and freeze raw. Simply thaw overnight before cooking sous vide.
After Cooking
Cooked carnitas freeze beautifully and make excellent camping or RV meals. Reheat gently over a campfire, stovetop, or skillet and serve after a long day outdoors.
Frequently Asked Questions
How long should I sous vide pork carnitas?
For the best balance of tenderness and texture, cook pork carnitas sous vide for 10 to 12 hours at 160⁰ Fahrenheit. Longer cooking times create even softer, more shreddable pork.
Can I make sous vide carnitas ahead of time?
Absolutely. Carnitas are excellent for meal prep and often taste even better the next day. You can refrigerate cooked carnitas for up to 4 days or freeze them for several months.
Do I need a vacuum sealer for sous vide cooking?
No. A BPA-free freezer bag using the water displacement method works perfectly well for sous vide carnitas. Just remove as much air as possible before sealing.
Why should I broil the carnitas after cooking?
Broiling adds the signature crispy edges that traditional carnitas are known for. The sous vide process creates tender meat, while a quick broil provides delicious texture and caramelization that carnitas are known for throughout Mexico.